Diamond Bar Wood Flooring installs and refinishes herringbone wood floors in Diamond Bar, CA, bringing more than 20 years of hardwood experience to one of the most exacting patterns in the trade, and we serve surrounding cities including Walnut, Rowland Heights, South San Jose Hills, Pomona and Brea. Herringbone rewards precision and punishes shortcuts: a pattern that starts a fraction off square is obviously crooked by the far wall.
In a city where most houses date from the 1970s and 1980s, herringbone often goes in where carpet or tile comes out, chosen by an owner who wants a floor that looks custom rather than builder grade. White oak in a natural or light brown tone suits that goal, and running it through an entry and living area lets the pattern greet people at the door.
We plan every herringbone floor on paper before the first board goes down, deciding where the center line runs, how the pattern meets doorways and cabinets and whether a border will frame it.
Herringbone and Chevron Patterns
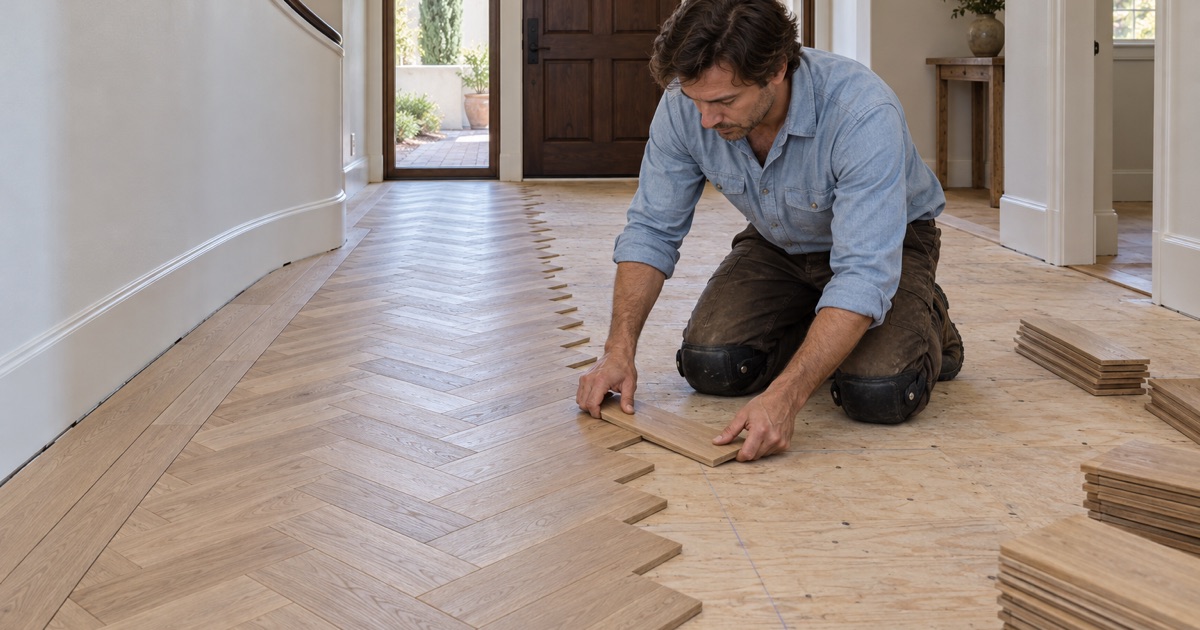
Classic Herringbone Layout
Herringbone boards are cut square at both ends and laid in pairs, with the end of one board meeting the side of the next at a right angle. The result is a zigzag that appears to move across the room. Boards come in left and right orientations, so both must be ordered in the right quantity and kept sorted during installation.
The length-to-width ratio of the boards changes how busy the pattern looks. Longer, narrower pieces create a finer zigzag, while wider boards read bolder and suit large rooms.
Chevron Floors
Chevron boards are cut with angled ends so each pair meets in a clean point, making a continuous V down the room. It looks more structured and formal than herringbone and draws the eye firmly in one direction. Because the angled ends must meet exactly, chevron leaves even less room for error at the layout stage.
Double and Triple Herringbone
Doubling or tripling the boards in each row creates a wider, woven look while keeping the herringbone geometry. It suits larger rooms where a single herringbone would feel small. The layout rules stay the same, but the order of boards is more complex to track.
Planning the Layout in Your Room
Setting the Center Line
We choose the center line based on how the room is seen, usually from the front door or the main approach to the room, not simply the geometric center. The pattern is then laid out so the points of the zigzag run parallel to the longest sight line. Chalk lines and a dry layout confirm the placement before any adhesive is spread.
That step also shows where cut pieces will fall at walls and doorways. Adjusting the center line by an inch or two can avoid a sliver of board against a prominent wall.
Borders and Transitions
A border of straight boards around the room frames herringbone neatly and hides the many cut ends at the walls. Borders also make transitions easier where herringbone meets another room of straight plank flooring. Where a height change is unavoidable, a matching T-molding or reducer is milled from the same species.
Open Floor Plans and Cabinet Runs
In an open kitchen and living space, we decide early whether the pattern flows through the kitchen or stops at a border. Cabinet bases and islands create many interruptions, and each one needs cuts that keep the zigzag continuous around it.
Materials for Herringbone Floors
White Oak and Other Species
White oak is the most popular choice for herringbone because its grain is calm enough to let the pattern stand out and it takes natural, gray and brown stains evenly. Red oak works well with warmer tones. Hickory and walnut create stronger contrast from board to board, which suits some rooms and overwhelms others.
Grade affects the look as much as species. A select grade with few knots gives a clean, refined floor, while a character grade adds knots and color variation that give herringbone a more rustic feel.
Solid or Engineered Herringbone
Solid herringbone can be sanded and refinished many times and is nailed and glued over a wood subfloor. Engineered herringbone has a hardwood wear layer over a stable core, handles glue-down over a concrete slab well and resists seasonal movement. Composite cores in engineered flooring sold in California must meet CARB Phase 2 or TSCA Title VI formaldehyde standards.
Site-Finished or Prefinished Boards
Site-finished herringbone is sanded flat after installation and finished in place, which gives a smooth surface across the joints. Prefinished boards install faster and come with a factory coating, though small bevels at the edges emphasize each piece. We explain how each option looks in your space before you order.
Installation and Finishing
Subfloor and Moisture Preparation
Small herringbone boards follow every contour of the subfloor, so flatness matters more than with long planks. We flatten plywood seams and test wood subfloors with a pin moisture meter or concrete slabs with an in-situ relative humidity test before installation. A moisture problem that would barely show under wide planks can loosen a herringbone floor.
Glue-Down, Nail-and-Glue and Fastening
Over concrete, herringbone is glued down with an adhesive suited to the slab and the moisture readings. Over plywood, boards are typically glued and fastened with small cleats or pins to hold the pattern tight while the adhesive cures.
Sanding and Finishing a Pattern Floor
Site-finished herringbone is sanded on the diagonal and blended with a multi-head orbital sander so the grain running in two directions does not show scratches. Finishes are chosen to fit South Coast AQMD Rule 1113, and each floor comes with a written cure schedule telling you when to walk on it and when furniture and rugs can return.
- 20+ Years of Wood Floor Work
- Free In-Home Estimates
- Dust-Contained Sanding